You can use Microsoft Office Outlook to connect to your e-mail account using POP3 or IMAP4.This tutorial assumes that you have already installed Microsoft Outlook in your computer. Double click the Microsoft Outlook desktop icon to open it. Follow the steps to set up Outlook 2010 / Outlook 2007 for IMAP or POP.
Microsoft Outlook quick installation guide – Insert the disc and wait for it to auto-load. Just follow the prompt and agree to the end user license agreement. Finally agree to install Microsoft Outlook at the default location (unless you have other requirements). Now you are done.
How to set up Outlook 2010 for IMAP or POP?
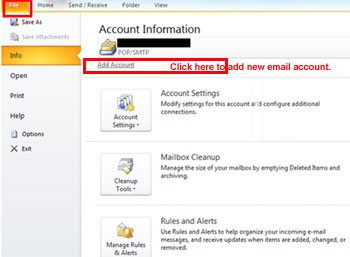
- Open Microsoft Outlook (Double click the desktop icon to open it). If you are opening Outlook for the first time after installation, a new account set up window will appear. Otherwise ( if you already use Outlook), click on the File tab and click Add Account just above Account Settings button to open new account set up window.
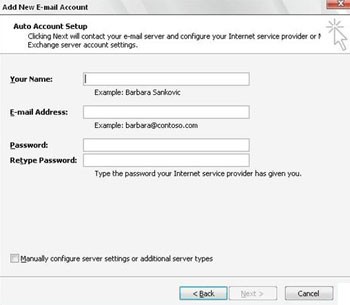
How to configure MS outlook Email ClientTweet This - On the Auto Account Setup page, fill your name, E-mail and password. (Note: Outlook may try to automatically fill in the name and e-mail Address based on how you’re logged on to your computer).
Note: Alternatively tick the Manually configure server settings if you know all of your account details and want to enter these manually.
Click Next to proceed. - After you click Next on the Auto Account Setup page of the wizard, Outlook will perform an online search to find your e-mail server settings. You’ll be prompted to enter your user name and password during this search. Make sure that you enter your full e-mail address (for example, you@findbestwebhosting.com) as your user name. If Outlook is able to set up your account, you’ll see the following text: Your e-mail account is successfully configured. Click Finish.


How do to set up Outlook 2007 for POP3 or IMAP4
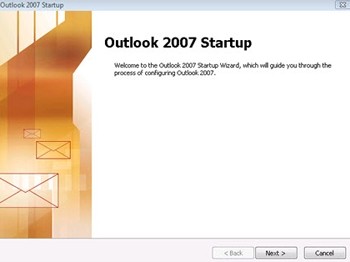
- Start Microsoft Outlook 2007. When the Startup Wizard displays, click Next.
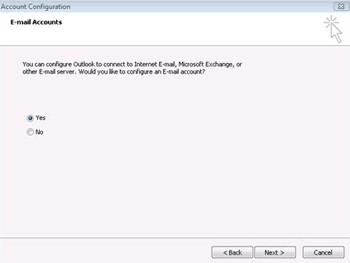
(Note: The Startup Wizard will open the first time you open Outlook. If the Startup Wizard doesn’t open when you first open Outlook, from the Tools menu, select Account Settings, and In the Account Settings dialog box, on the E-mail tab, click New.) - On the Account Configuration page, select Yes to indicate you want to configure an email account, and then click Next.
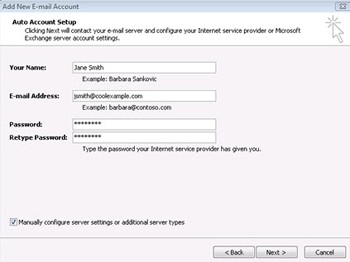
- On the Auto Account Setup page, enter your name, email address, password. At the bottom of the page, select Manually configure server settings or additional server types, and then click Next.
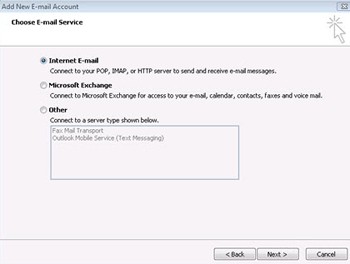
- On the Choose E-mail Service page, select Internet E-mail, and then click Next.
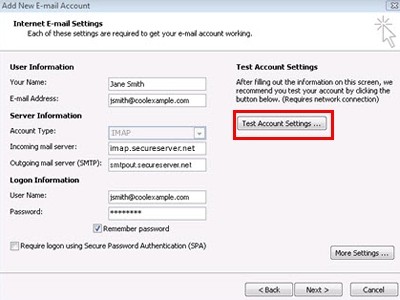
- On the Internet E-mail Settings page, enter user information and server information as follows:
Under User Information:1. In the Your Name box, enter the name you want users to see when you send e-mail from this account.
2. In the E-mail Address box, enter your e-mail address.Under Server Information:1. Under Account Type, select IMAP or POP3. Consider using IMAP.
2. In the Incoming mail server box, enter the IMAP or POP server name.
3. In the Outgoing mail server (SMTP) box, enter the SMTP server name.Under Logon Information:
1. In the User Name box, enter your e-mail address.
2. In the Password box, enter your password. If you want Outlook to remember your password, make sure the check box next to Remember password is selected. - At the lower-right side of the page, click More Settings
- In the Internet E-mail Settings window, fill in the Internet E-Mail Settings dialog box as follows:
On the Outgoing Server tab, select My outgoing server (SMTP) requires authentication.
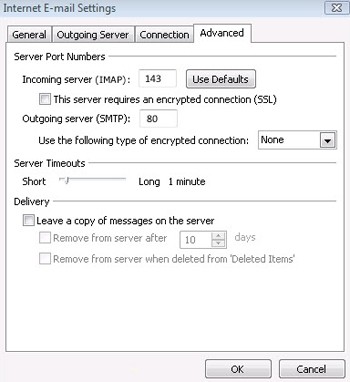
On the Advanced tab:
- Under Incoming server (IMAP), or Incoming server (POP3), next to Use the following type of encrypted connection, select SSL in the drop-down box.This is for secure ms outlook connection.
- Under Outgoing server (SMTP), next to Use the following type of encrypted connection, select TLS, and then click OK.
- If you’re using POP3 and you want to keep a copy of your messages on the server, under Delivery, click Leave a copy of messages on the server. If you don’t select this option, all messages will be removed from the server and stored locally on your computer.
- Click Test Account Settings. Outlook will send itself a message to test your incoming and outgoing capabilities.
Once this is complete, click Next. - On the Congratulations page, Click Finish.