
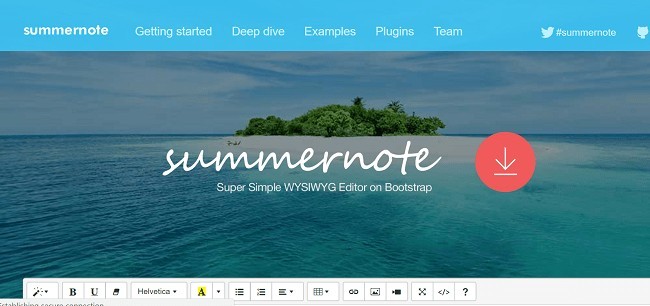
Summernote is a nifty WYSIWYG style editor with lots of useful features a developer would love.
And it is one of the best WYSIWYG editors that Laravel supports.
Whatsmore, support is great because the project has earned over 7600 stars on GitHub!
Summernote Features
It ticks all the boxes when it comes to features. Here are few of the best features:
- Text Editing
- Server integration
- HTML Formatting
- Paste images on your web pages
- Editing blocks of texts – all in real time.
It enables you to get the idea of how the content will look like when the final webpage gets up and running.
A bit about WYSIWYG
What You See Is What You Get (WYSIWYG) is a popular term used by developers to describe an editor or a software program that they use to check the visibility of the final product or application.
A WYSIWYG program runs on an interface. A developer can use a WYSIWYG editor to write descriptive codes. It helps the developer to see the content that will appear as the end-result of the whole exercise.
Purpose of WYSIWYG
The WYSIWYG editor provides the developer an opportunity to check out what the document or code will look like after finalization in real time.
One of the advantages of using WYSIWYG editor is that it makes processing easier and quicker. Therefore, UI developers can not only save a good time using it and can make their job easier.
But can also utilize that time in other places of UI development and content creation.
Recommended CSS Tools:
CSS Minify Tool: Compress your CSS code significantly, reduce size and make your web pages faster! It is of course, Free!
CSS Beautify Tool: Beautify your ugly CSS code to well structured readable CSS code! Free!
WYSIWYG Editors Supported By Laravel
Well Laravel users have a good news…
Laravel supports multiple WYSIWYG editors. Laravel Manager by Vinelab and Laravel ckeditor by UniSharp are two of the most commonly used custom WYSIWYG editors.
Froala and Summernote are two extremely user-friendly Laravel WYSIWYG editors that you as a developer can use to your advantage and keep a track of how the final web page will look in real time.
Summernote : Easy to setup
I have personally used Summernote on a Laravel Project and I do hereby admit that using Summernote editor was the right choice. As the project was up and running within minutes, thanks to the user-friendly features that Summernote provides to the developers.
Now, you are well aware of the advantages, it’s time to learn how you can integrate and implement Summernote WYSIWYG with Laravel.
Summernote Prerequisites(For Laravel)
For the purpose of this tutorial, I assume that you have a Laravel application installed on a web server. My setup is:
- Laravel 5.5
- PHP 7.x
- MySQL
For an optimized dev stack, I have installed my Laravel application on a Cloudways managed server.
You can also sign up for free on Cloudways, and setup your Laravel server easily within few minutes.
Configure the Database
Now setup the MySQL database and configure it in Laravel.
In the root directory of the project, edit the .env and config/database.php files. Update the database credentials (username, DB name, and password) in them to setup the database so that Laravel app can access it.
Create the Migrations
Now open the terminal and go to the root of the app and generate a migration for creating task table.
cd /path-to-project/project-name
php artisan make:migration create_summernoteeditor_table –create=summernoteeditor
Next, open the migration file in the database/migration folder and replace the up() function with the below code:
Setup Model
Generate a model along with a resourceful controller and a migration file.
namespace App;
use Illuminate\Database\Eloquent\Model;
class Summernote extends Model
{
//
}
After successfully creating the model, now migrate your table to the database by the following
Setup Routes
Now create routes for summernote editor view and another for post method. So let’s add this routes in web.php.
Route::get(‘/’, function () {
return view(‘welcome’);
});
Route::get(‘summernoteeditor’,array(‘as’=>’summernoteeditor.get’,’uses’=>’SummernotefileController@getSummernoteeditor’));
Route::post(‘summernoteeditor’,array(‘as’=>’summernoteeditor.post’,’uses’=>’SummernotefileController@postSummernoteeditor’));
Auth::routes();
Route::get(‘/home’, ‘HomeController@index’)->name(‘home’);
Setup Summer Note
Now download the JavaScript and CSS files from the summernote.org. After downloading, setup these files in your Laravel project. While to add the Javascript and CSS files, use the below assets function.
<a href=”http://!!asset(‘/assets/js/summernote.min.js’)!!”>http://!!asset(‘/assets/js/summernote.min.js’)!!</a>
Do reaffirm that you have given the directory reference correctly. Add the above code in masterblade.php.
Summernote CDN
Also use CDN to directly link these summernote javascript and css files and include jquery file for calling jquery functions.
<script src=”http://cdnjs.cloudflare.com/ajax/libs/summernote/0.8.4/summernote.js”></script>
At the bottom of the master.blade.php file, open a script tag and add the summernote code.
$(‘#technig’).summernote({
height:300,
});
});
Make sure that you have added jQuery to your project, because Summernote is also compatible with the jQuery framework. You can add some desired properties to your summernote functions so that it works the way you want.

Setup Controller
After successfully setting your web routes, next go to your controller files and set your controller by paste following code.
So, let’s create Controller.php file and put bellow code:
<php
namespace App\Http\Controllers;
use Illuminate\Http\Request;
use App\ Summernote;
class SummernotefileController extends Controller
{
/**
* Show the application dashboard.
*
* @return \Illuminate\Http\Response
*/
public function getSummernoteeditor()
{
return view(‘summernoteeditor’);
}
/**
* Show the application dashboard.
*
* @return \Illuminate\Http\Response
*/
public function postSummernoteeditor(Request $request)
{
$this->validate($request, [
‘detail’ => ‘required’,
‘feature’ => ‘required’,
]);
$detail=$request->input(‘detail’);
$feature=$request->input(‘feature’);
$dom = new \DomDocument();
$dom->loadHtml($detail, LIBXML_HTML_NOIMPLIED | LIBXML_HTML_NODEFDTD);
$images = $dom->getElementsByTagName(‘img’);
foreach($images as $k => $img){
$data = $img->getAttribute(‘src’);
list($type, $data) = explode(‘;’, $data);
list(, $data) = explode(‘,’, $data);
$data = base64_decode($data);
$image_name= “/upload/” . time().$k.’.png’;
$path = public_path() . $image_name;
file_put_contents($path, $data);
$img->removeAttribute(‘src’);
$img->setAttribute(‘src’, $image_name);
}
$detail = $dom->saveHTML();
$summernote = new Summernote;
$summernote->content = $detail;
$summernote->Feature=$feature;
$summernote->save();
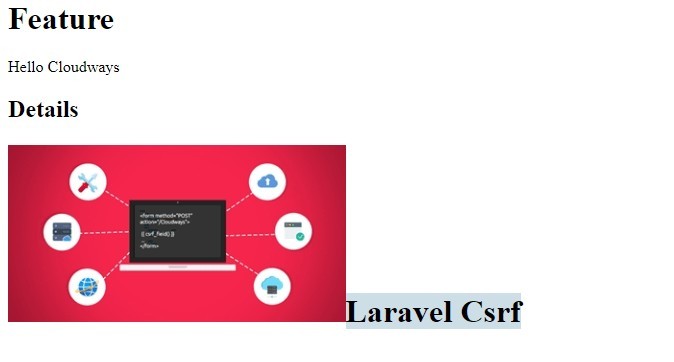
echo “<h1>Feature</h1>” , $feature;
echo “<h2>Details</h2>” , $detail;
}
}
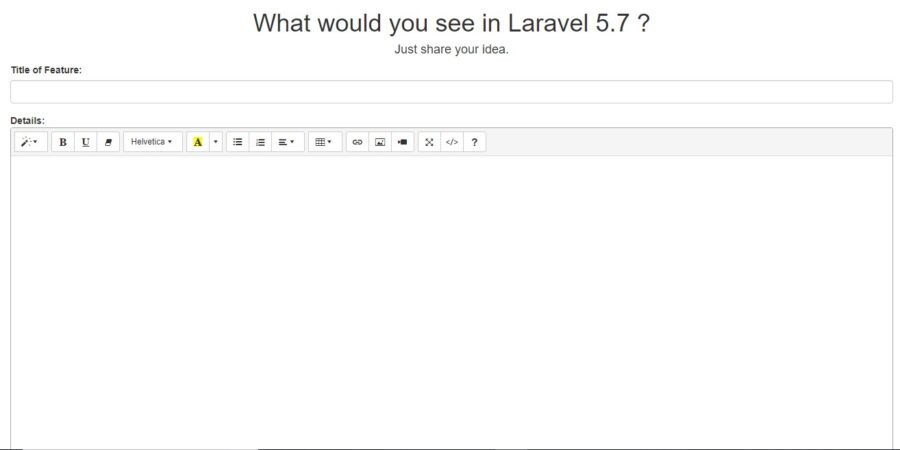
Setup View
After setting the controller code, next step is to create the view code for display. In summernote editor just paste the following code in the blade file .
<html>
<head>
<title>Laravel 5 – Summernote Wysiwyg Editor with Image Upload Example</title>
<script type=”text/javascript” src=”https://code.jquery.com/jquery-1.9.1.min.js”></script>
<link rel=”stylesheet” href=”https://netdna.bootstrapcdn.com/bootstrap/3.1.1/css/bootstrap.min.css” />
<script type=”text/javascript” src=”https://netdna.bootstrapcdn.com/bootstrap/3.1.1/js/bootstrap.min.js”></script>
<!– include summernote css/js–>
<link href=”http://cdnjs.cloudflare.com/ajax/libs/summernote/0.8.4/summernote.css” rel=”stylesheet”>
<script src=”http://cdnjs.cloudflare.com/ajax/libs/summernote/0.8.4/summernote.js”></script>
</head>
<body>
<form method=”POST” action=”{{ route(‘summernoteeditor.post’) }}”>
{{ csrf_field() }}
<div class=”col-xs-12 col-sm-12 col-md-12″>
<div class=”col-xs-12 col-sm-12 col-md-12″>
<center><h1>What would you see in Laravel 5.7 ? </h1>
<h4>Just share your idea.</h4>
</center>
<div class=”form-group”>
<label for=”usr”>Title of Feature:</label>
<input type=”text” class=”form-control” name=”feature”>
</div>
<div class=”form-group”>
<strong>Details:</strong>
<textarea class=”form-control summernote” name=”detail”></textarea>
</div>
</div>
<div class=”col-xs-12 col-sm-12 col-md-12 text-center”>
<button type=”submit” class=”btn btn-primary”>Submit</button>
</div>
</form>
</body>
<script type=”text/javascript”>
$(document).ready(function() {
$(‘.summernote’).summernote({
height: 500,
});
});
</script>
</html>

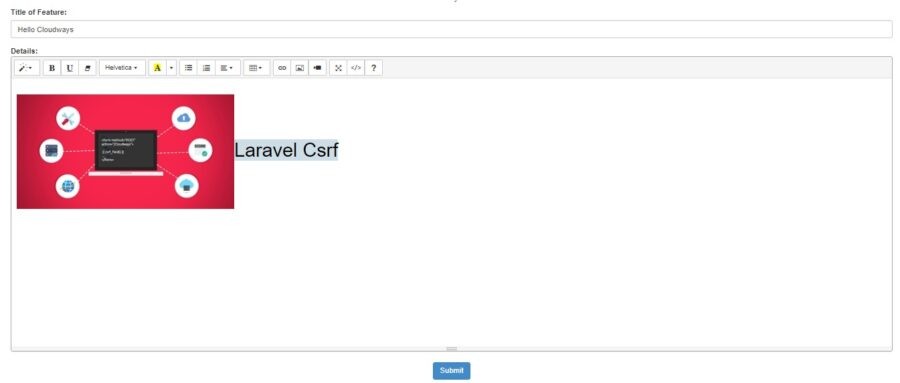
When you will click on the submit button , it will show the following output.

Final Words
In this blog, I have provided a detailed account on how to install and integrate Summernote WYSIWYG editor with Laravel. Summernote is an easy-to-use, yet attractive editor as it provides rich text editing tools.
You can also integrate Summernote Plugin with modern PHP frameworks like Laravel. I hope that this article helps you to develop optimized code in Laravel with the Summernote editor and here is the application in action.You just first have to register yourself on the application and can use it after successfully registering
You can share your thoughts about the article in the below comments section.
Author bio
Pardeep is a PHP Community Manager at Cloudways – A Managed PHP Hosting Platform. He love to work on Open source platform , Frameworks and working on new ideas. You can email him at pardeep.kumar@cloudways.com