

File management is a critical functionality of any web hosting account as this manages the content that your customers see on your website. The File Manager is an easy to use fully featured interface that allows you to do basic file management for your cPanel.
About cPanel: cPanel is the control panel for all Linux based hosting accounts and this article shows you how to use File Manager inside cPanel. Let us see how to launch the File Manager and how to use it.This article assumes you have already logged into your cPanel!
SiteGround: For pupose of this article, we have used SiteGround hosting account. SiteGround is a super fast reliable web host and we have hosted many linux based hosting accounts using SiteGround. If you want to hose a new site or plan to move to a more reliable web host, Siteground is the one! Go for ir with full confidence
Table of Contents
- How to open File Manager?
- How to create a new folder using File Manager
- How to create a new file using File Manager
- How to copy a file using File Manager
- How to move a file using File Manager
- How to upload a file using File Manager
- How to Download/Delete/Rename/Edit/view a file using File Manager
- How to Zip/Compres / Extracting a file using File Manager
How to open File Manager?
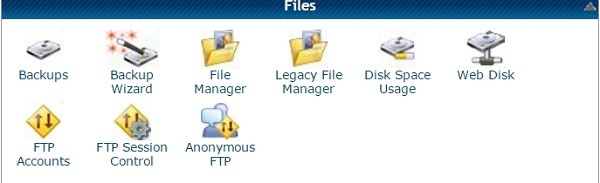
Click on File Manager icon under Files section.

Select your location from the directory selection popup that appear.
You can see different options here.
- Web root (public_html /www) is the folder where you place all your files.
- In Shared hosting accounts, all addon domains create subfolders in the public_html folder and keep files there. You can either select web root or ‘Document root for domain’ with ‘domain name’ to access files under your domain.
- Also Click enable the “Show Hidden Files (dotfiles)” option in order to be able to see files that start with a dot (.), for example – .htaccess.
Click the Go button.
Now that you reached the file manager section. Some basic sections of file manager are listed below.

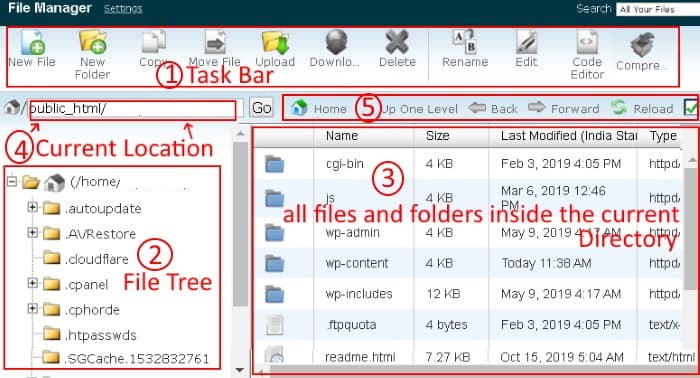
- On the top, you can see task bar with image symbols like ‘New File’, ‘New Folder’ etc.
- On the lower left side, you’ve got a directory tree that enables you to easily access any folders rapidly. Go ahead and click on ‘public_html’. then you can see all the files and folders present under it.
- On the right hand side of directory tree, is the list of all files and folders inside the directory you’re presently in.
- In between directory tree and task bar you see the entire path to your current directory.
- On right to this path, you can see a group of controls that act like go back, forward, up a directory, refresh your directory you’re in or visit the home directory.
How to create a new folder using File Manager

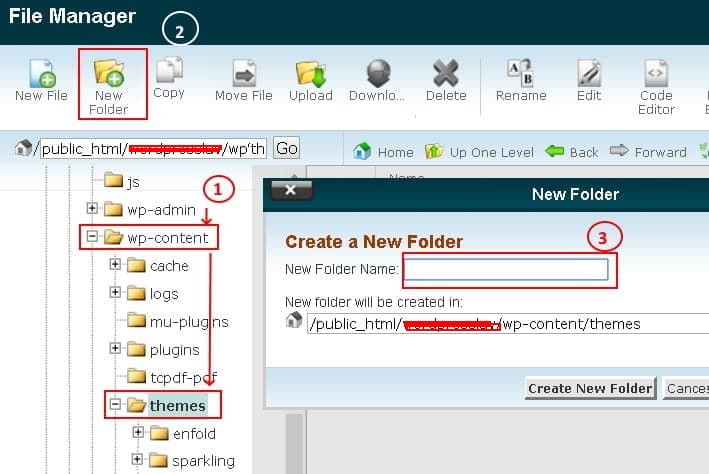
- (Optional) Navigate to the folder where you want to upload your files.(You can skip this step if you want to put new folder in current directory). For example, I am in ‘public_html’ folder and I want to create a new folder in wp-content/themes folder. So click on public_html/ wp-content first and then themes.
- Click on the New Folder button.
- A pop-up will appear. Enter new folder a name and click the Create New Folder button.
- The new folder will appear in the chosen location.
How to create a new file using File Manager
You can create new file in the similar way you create a new Folder


- Click on the New File button
- A pop-up will appear. Enter new file name and click the Create New File button.
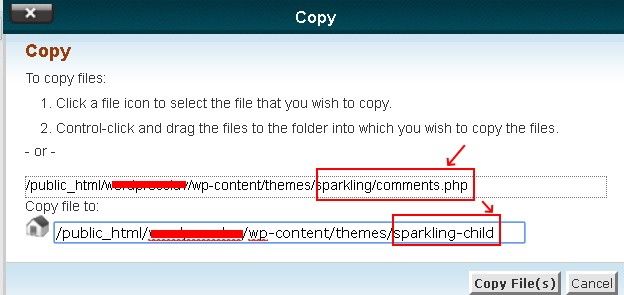
How to copy a file using File Manager

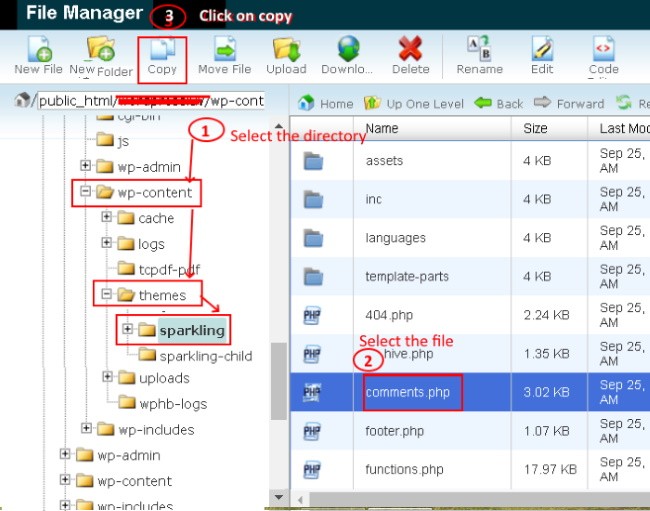
- (optional) Navigate to the directory to find your file
- Select the file you want to copy
- Click on Copy button
- A pop-up will appear asking you to enter the location. Once you input that information, click the copy file File button.
- The file will appear in the chosen location.

How to move a file using File Manager

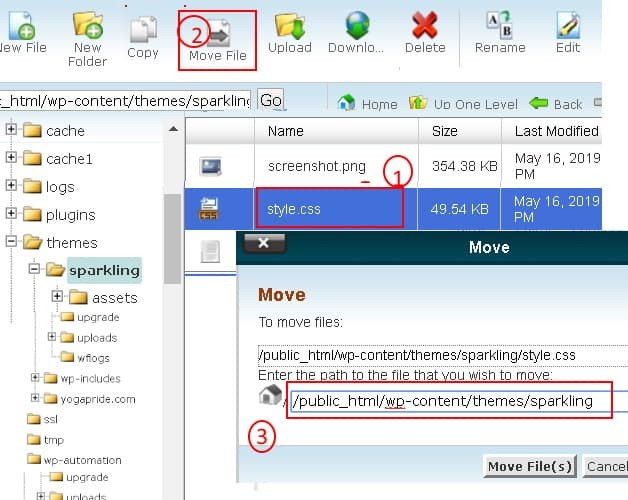
- Select the file you want to Move
- Click on Move file button
- A pop-up will appear asking you to enter the location. Once you input that information, click the Move file button.
- The file will appear in the chosen location.
How to upload a file using File Manager

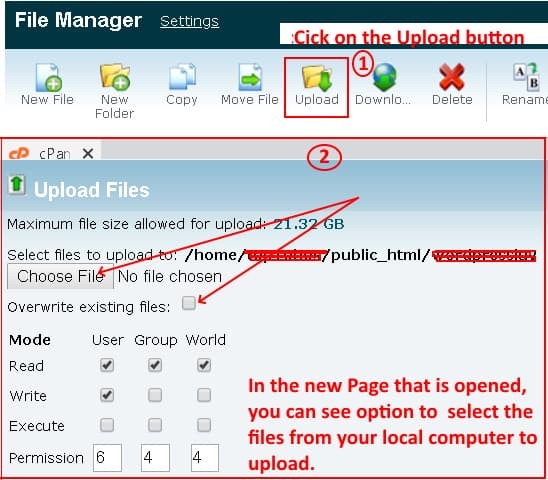
- Click on the Upload button.
- A new page will open . Click on Browse button to select the files from your local computer to upload to your account. Check the Overwrite existing files option if you want to replace/overwrite existing files with the same name.
- The upload will start automatically.
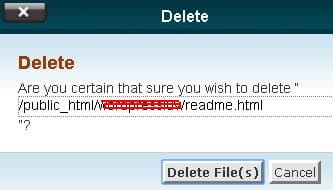
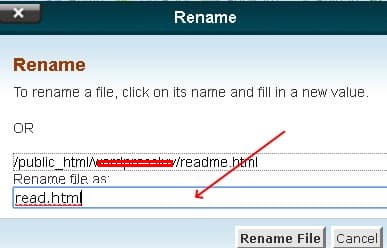
How to Download/Delete/Rename/Edit/view a file using File Manager

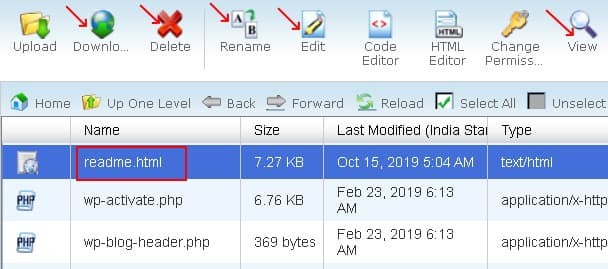
- Select a file
- Click on Download/Delete/Rename/Edit/view button on top and follow the pop up.


How to Zip/Compres / Extracting a file using File Manager
compression and extraction of files are useful when you backup your website or install a third-party software through cPanel.
Compressing

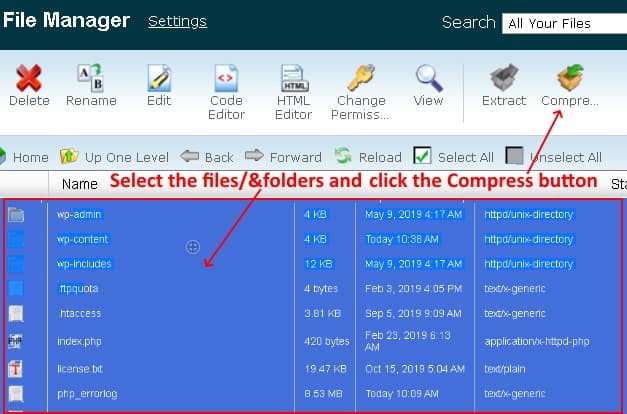
- Select the files and folders to compress
- Click on Compress button.
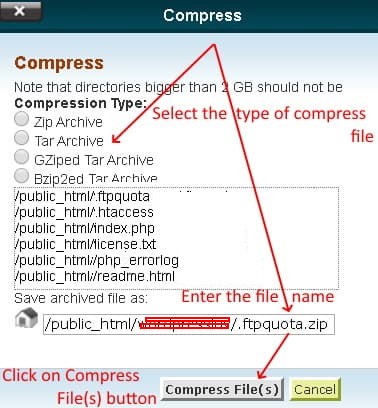
- A popup appears.In the pop up ‘select the type of compress file you want. Choose the radio button to have a ZIP file. Enter the file name and location of your compress fie. Click on the Compress File(s) button.
- Wait for cPanel to compresses them. After a while, you can see a popup showing the compress percentages of different files. Click on Close button.
- You can see a ZIP file available in your directory.(if you do not see it click on reload button. refer fig below)

Extracting

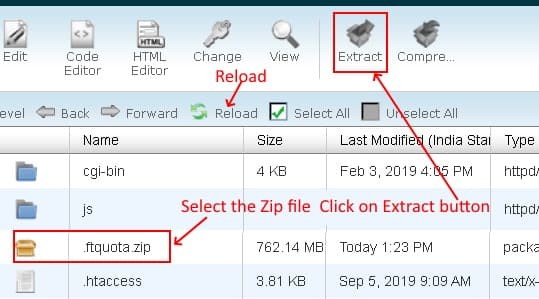
- Select the zip file to extract
- Click on Extract button.
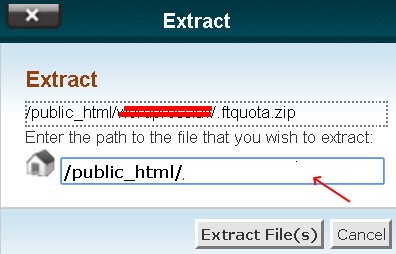
- A popup appears. Enter the location where you want to extract the content of the ZIP file to. Click on the Extract File(s) button.
- Wait for a while. Now you can see all the files of the compressed file in their extracted form.

Sum it up!
So we have seen how to use File Manager inside a cPanel. Do you have any questions? Why not ask in the comments section below?