
What is the best business model that offers consistent earning for any business? It’s definitely not the one time sale or suggestive sales. If you said advertising, then you were close, but still wrong. Advertising can only be considered consistent income when your site traffic is really high.The best revenue model for any web-based business is customer membership.
Now, this membership can be monthly, quarterly, or yearly as per your products and business capacity. Most of the top enterprises, like Amazon, YouTube, etc. are following this model.
What is a Membership Site?
Just like in the real world as many franchises like Gyms, Nightclubs, Universities, etc. Have memberships for its clients.
Similarly, many online businesses follow a similar format. Let’s consider the examples mentioned above; Amazon offers a service called Amazon Prime. This is a subscription-based service which gives access to their premium services across all verticals they work in.
If we simplify this concept In a general term; consider that on a membership website, there are numerous content available only to the paying members of the website. So the site may give away some of the content to non-members. This is a marketing tactic to persuade them to purchase the membership for even better service and access to the site’s complete content.
If a user wants to access the full content, they have to become a member by paying the membership fee. You will decide the membership fee and the length of membership (membership tenure).
Once the members have paid for the premium service, they can access the content until their membership expires. The customers who wish to continue using your services can renew their membership for further access to the site’s content.
7 Good reasons why a membership site will benefit you


No business is done just for the passion; you need to have good revenue and a solid profit in the business.
So, why should you create a membership site in 2019?
1. Assures Consistent Revenue: What is the number one rule in any business? To get a consistent flow of revenue to support the business. Membership sites can generate such a continuous income for you. Once you have attracted an initial user base, predicting your yearly revenue and planning a future business model on the same will become pretty accurately.
2. This Business is Easy to Start: A membership website is much easier to start than a regular business.
3. No Need to Sell Physical Products: Physical products can be lucrative to sell, but they come with their own set of challenges like order management, inventory, shipping, and many more. Membership websites don’t have these challenges as they only manage client membership.
4. Revenue can be Built Quickly: This business is such that a small number of users can also fetch you good revenue. So, if you have only 100 people that will pay $10 a month to access your site’s services, then you would be generating a revenue of $1000/month.
5. It’s an Auto-Pilot Business Model: You don’t need to supervise the entire business at all times. It’s a self-sufficient business that can work on its own with a slight observation now and then.
6. Organic Growth: A good percentage of new users will come from referrals from your existing members. So, your membership site can and will grow organically.
7. No reliance on SEO: If in the past, you have owned a site that relied on SEO activities for income and to stay relevant, then you know what I am talking about. Here you are free from that concern, as membership sites may surely benefit from SEO, but they don’t completely rely on SEO activities.
Now that you know what a membership site is and the benefits of starting a membership-based site, let’s talk about the process to create a WordPress membership site.
How to Create a WordPress Membership Site?
We are looking into create a membership site using WordPress. We will first setup a wordpress website and then use a wordpress plugin, WordPress Membership Plugin, to setup your membership website.
Here are the steps:
- Create a WordPress WebSite
- Install and activate WordPress Membership Plugin
- Including Multiple Payment Options
- Setup Tax Rules
- Making Different Membership Account Levels
- Restrictions to Accounts as per Membership Plans
- Make a Pricing Page
Step 1: Setup a WordPress Website
Setting up a WordPress website is relatively easy. We will use Siteground hosting service for setting up your wordpress website.
FYI: Siteground is strongly recommended by WordPress.org itself. So you can signup with full confidence.
Signup for SiteGround wordpress hosting plan and SiteGround support can setup a new wordpress website for you. Or you can do it yourself using “AutoInstaller” from your control panel.

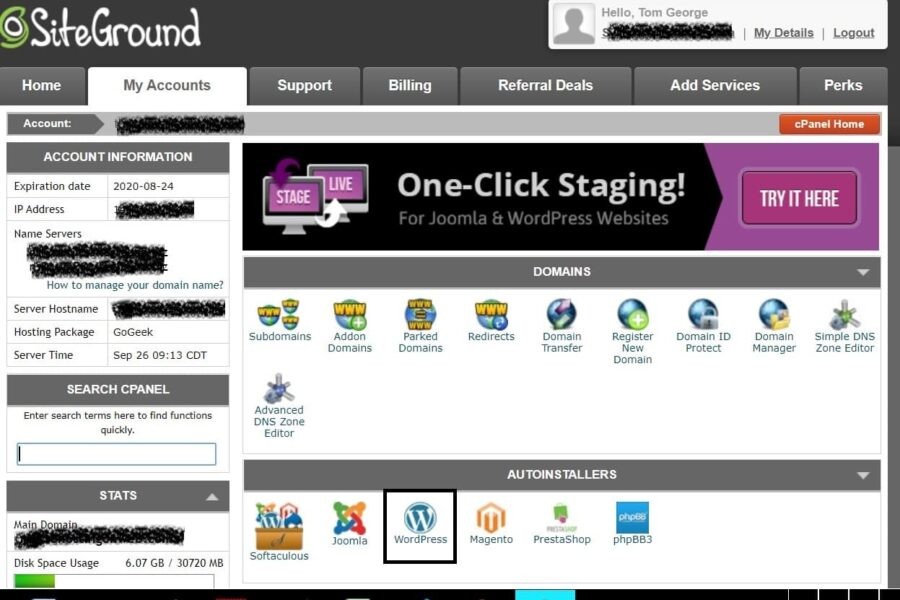
(Or we can help you install WordPress for you: Contact us!)
Signup for SiteGround wordpress hosting plan
Step 2: Install and Activate WordPress Membership Plugin
Once you have a WordPress site up and running, the next stage is to convert it into a membership site by adding a WordPress membership plugin.
We strongly recommend MemberPress, which has advanced features such as setup memberships levels, setup paid-only premium content, sell subscriptions or digital downloads etc
Here are few big benefits of this powerful plugin:
- Subscription Billing
- Payment Integration
- Customizable Checkout
- Content Protection
- Member Management
- Content Dripping
- Email Reminders
- Self-Serve Member Dashboard
- Coupons
- Autoresponder Integrations
- Affiliate Program
Important Note: MemberPress is a highly popular Premium plugin and is not available as a free plugin. So you need to purchase the plugin, download the plugin zip and then upload to your wordpress blog. Cost is $149/year. Yes. It is not cheap. But it has so many features.
MemberPress has a 14 day money back guarantee and you can confidently buy it. In case you are not happy, you ca get full refund.
Buy MemberPress Premium Plugin
Once you have purchased from MembersPress website, login to your account and download the plugin zip file.
Install and activate the MemberPress plugin:
From your WordPress Dashboard, click on plugins and then click “Upload plugin” and choose the zip file you downloaded from Memberpress website. Once installation is complete, click on “Activate” to activate the plugin.

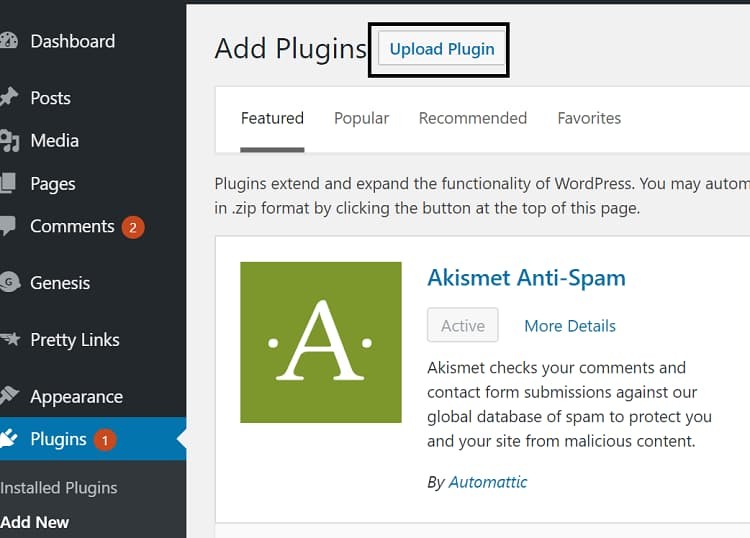
Open MemberPress Options: After activating, you must visit the MemberPress » Options page to configure the module settings.


Step 3: Including Multiple Payment Options
Now, the main thing you have to set up is a payment gateway for your site users to purchase their membership to your site. You can do this by changing to the ‘Payment’ tab and after that, choosing your preferred payment gateway(s).

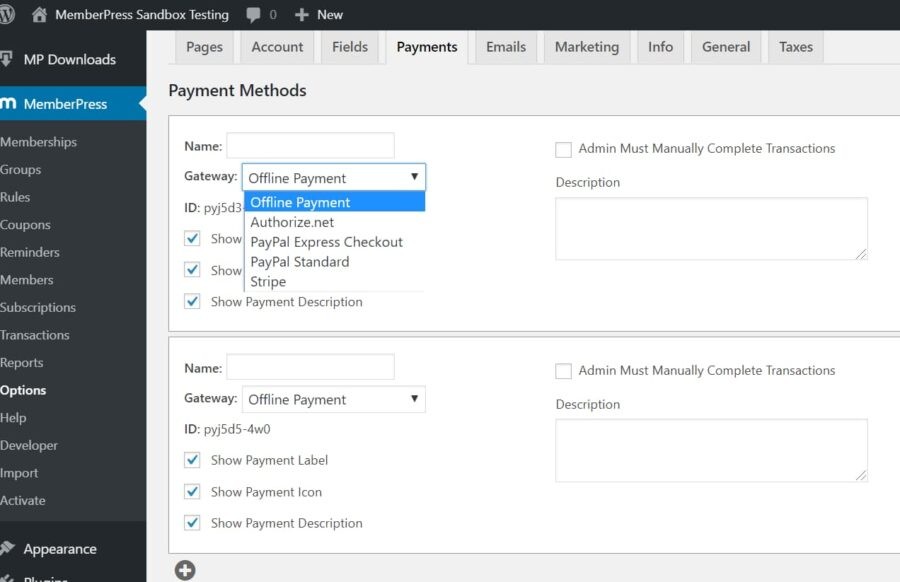
MemberPress underpins PayPal (Standard, Express, and Pro), Stripe, and Authorize.net among a few others. Choose the payment modules that you wish to add to your membership site and give the required credentials.
You can likewise include additional payment options by tapping on the add button to include multiple payment gateways. Always remember to tap on the ‘Update Options’ button to save your settings.
Step 4: Setup Tax Rules
There are different kinds of e-commerce stores, and all have to pay taxes based on the products and services that they offer.
Remember that every membership website is unique; some offer informative content, while others may provide downloadable digital goods or even physical products. Each of these offerings has different tax rates to consider.

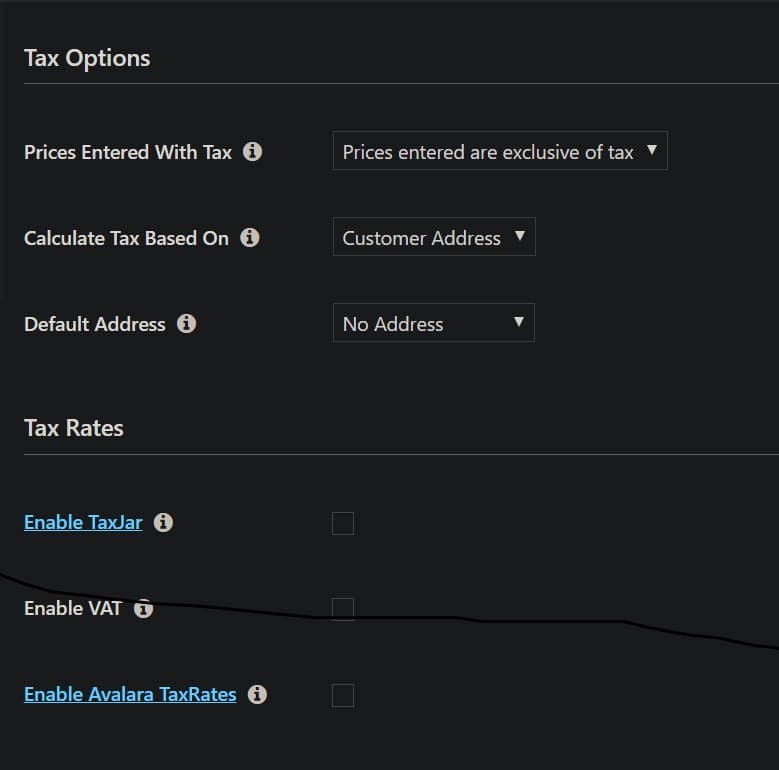
So, first of all, you must go to the ‘Tax Options’ module and tick the “enable taxes and tax calculations” checkbox. Then, choose whether you will enter prices inclusive of taxes or exclusive.
Further, you need to choose on which basis will the tax be calculated:
- Shipping Address of the Customer: Taxes will be calculated according to the customer shipping address.
- The Billing Address of Customer: Taxes will be calculated according to the customer billing address.
- The Shop Base Address: Taxes will be calculated according to the nearest shop location to you.
Step 5: Making Different Membership Account Levels
As decided earlier, this is a membership-based site that we are building. So, you need to add the membership category. If it is a single level plan like Amazon’s Prime membership, then just a single level account is enough.
However, if you are planning to offer different levels of services and content to different users, then you need to make a multi-level membership account structure.
Every membership level will have unique pricing, advantages, and access. You can even have a free participation plan like Netflix does for the first month of free (demo) subscription.

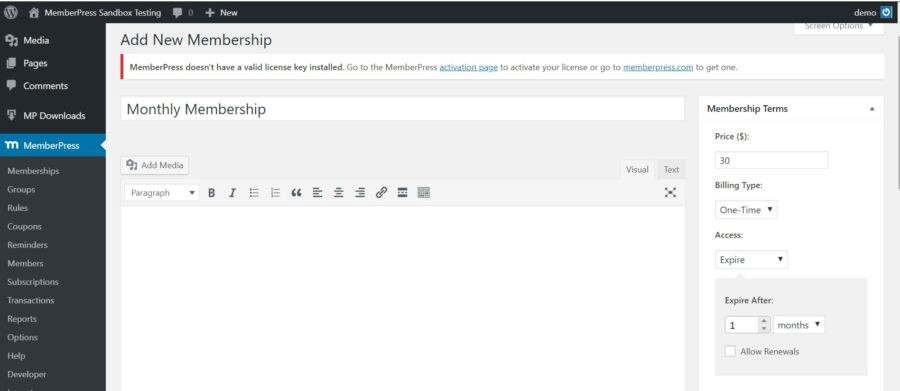
To make a membership level, you have to go to MemberPress » Memberships page and click on the ‘Add New’ button at the top. Then on the following page, enter a title for this specific membership plan and after that, give the plan details in the post editorial manager.
Remember to set the pricing and lapse duration for this membership plan under the enrollment terms section. When you are happy with the membership plan, you can tap on the publish button to make it accessible.
Do the same steps for any number of membership plans that you wish to launch for your website.
Step 6: Restrictions to Accounts as per Membership Plans
You have bifurcated the membership plans, and each plan has its own perks and access. So, you need to also bifurcate the site’s content according to the membership plan. The following stage is to choose which content would be accessible to various memberships of your site. MemberPress makes it simple to control access using ‘Rules.’

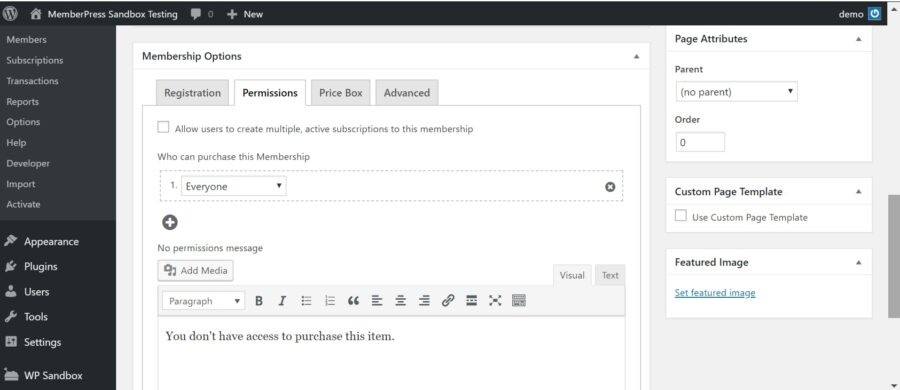
You can set rules and conditions by visiting the MemberPress » Rules page and tapping on the “Add New” button at the top. The standard edit page enables you to choose various conditions and partner them with different membership plans.
For instance, you can choose all content that matches a specific tag or membership class to be accessible just to individuals with that membership plan. Also, there are other options like drip content so that you launch content in a gradual fashion instead of all at once and the content expiration feature that deletes content after a defined period of time.
Step 7: Make a Pricing Page
On this page, your clients will choose an enrollment plan and move to the payment page. The users who attempt to get to the paid regions or restricted areas of your site will likewise be diverted to this page.
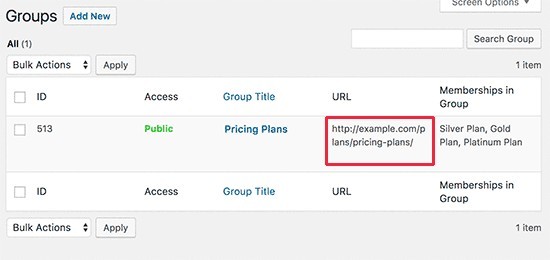
You can arrange this by tapping on the “Add New” button at the top of the MemberPress » Groups page.
To begin with, enter a title for the group plan. This will likewise be the title for the plans page that clients will see. Next, go down to ‘Group options’ metabox and add the memberships that you need to show on the page.

Further, choose from the themes provided for the pricing table. MemberPress accompanies few instant layouts for that. WP also comes some ready-made templated to make your work easier and quicker.
When fulfilled, click on the ‘Publish’ button and make your arrangement viewable and accessible for all. To review your evaluating page, click on the ‘View Group’ interface after distributing it.
Presently unauthorized site users will be diverted to the membership plans page when they attempt to get into an unauthorized space.
Important Links:
Launch Your Own WordPress Membership Site
That is all for now; I trust this article helped you in understanding the process of setting up your own WordPress membership site. Although WordPress is a very easy platform to start your own business site, it is always better to hire expert WordPress developers to build your membership site.
Author Bio: Paresh Sagar is the CEO of Excellent Webworld, IoT, Web and Mobile App Development Company that helps startups and enterprises to enable mobility solution. He’s an avid blogger and writes on all the latest technology trends.